
MATLAB、Python、Scilab、Julia比較ページはこちら
https://www.simulationroom999.com/blog/comparison-of-matlab-python-scilab/

はじめに
の、
MATLAB,Python,Scilab,Julia比較 第3章 その106【射影変換(台形→長方形)④】
を書き直したもの。
射影変換の話の続き。
台形の画像を長方形にする。
今回はPython(NumPy)でこれを実現する。
【再掲】変換元、変換先パラメータ
まずは、変換元、変換先パラメータを再掲。
\(
\begin{eqnarray}
(-0.5,-0.8)→&(-1,-1)\\
(-0.8,0.8)→&(-1,1)\\
(1,1)→&(1,1)\\
(0.4,-1)→&(1,-1)\\
\end{eqnarray}
\)
今回は、このパラメータによる射影変換をPython(NumPy)で実現する。
Pythonコード
Pythonコードは以下になる。
import numpy as np
import cv2

# アフィン変換関数
def homograpy(img, matrix):
    # 画像サイズ取得
    hight, width = img.shape

    # 中心を0とした座標系を生成
    x_axis = np.linspace(-1, 1, width);
    y_axis = np.linspace(-1, 1, hight);
    xim,yim = np.meshgrid(x_axis, y_axis);

    # 座標x,y,1の3次元ベクトルの配列
    # reshapeで行ベクトル化、「*」で式展開
    points=np.array([[*xim.reshape(width*hight)],
                     [*yim.reshape(width*hight)],
                     [*np.ones((width*hight))]])

    # 変換元座標算出
    points_homography = matrix @ points;

    # 画像と同一形状の2次元配列に変換元座標配列を生成
    dx = points_homography[0,:].reshape(hight,width)
    dy = points_homography[1,:].reshape(hight,width)
    ds = points_homography[2,:].reshape(hight,width)
    dx = dx/ds
    dy = dy/ds

    # 変換元座標をピクセル位置に変換
    v = np.clip((dx + 1) * width / 2, 0, width-1).astype('i')
    h = np.clip((dy + 1) * hight / 2, 0, hight-1).astype('i')

    # 元画像と変換元座標を元に変換先へコピー
    return img[h, v]

def homography_toRectangle_test():
    # 入力画像の読み込み
    img = cv2.imread("dog_homography_toTrapezoid.jpg", cv2.IMREAD_GRAYSCALE)

    x0=-0.5; y0=-0.8;   # 左上
    x1=-0.8; y1= 0.8;   # 左下
    x2= 1; y2= 1;   # 右下
    x3= 0.4; y3=-1;   # 右上

    x0t=-1; y0t=-1;	# 左上変換先
    x1t=-1; y1t= 1;	# 左下変換先
    x2t= 1; y2t= 1;	# 右下変換先
    x3t= 1; y3t=-1;	# 右上変換先


    mat = np.array([ [x0, y0, 1,  0,  0, 0, -x0*x0t, -y0*x0t],
                     [ 0,  0, 0, x0, y0, 1, -x0*y0t, -y0*y0t],
                     [x1, y1, 1,  0,  0, 0, -x1*x1t, -y1*x1t],
                     [ 0,  0, 0, x1, y1, 1, -x1*y1t, -y1*y1t],
                     [x2, y2, 1,  0,  0, 0, -x2*x2t, -y2*x2t],
                     [ 0,  0, 0, x2, y2, 1, -x2*y2t, -y2*y2t],
                     [x3, y3, 1,  0,  0, 0, -x3*x3t, -y3*x3t],
                     [ 0,  0, 0, x3, y3, 1, -x3*y3t, -y3*y3t]])
    dst = np.array([x0t, y0t, x1t, y1t, x2t, y2t, x3t, y3t]).T
    res = np.linalg.inv(mat)@dst;

    homo_matrix = np.array([ [res[0], res[1], res[2]],
                             [res[3], res[4], res[5]],
                             [res[6], res[7],     1 ]])
    homo_matrix = np.linalg.inv(homo_matrix)

    # 射影変換
    homography_img = homograpy(img, homo_matrix )

    # グレースケール画像の書き込み
    cv2.imwrite("dog_homography_toRectangle.jpg", homography_img)

    return;


homography_toRectangle_test()
処理結果
処理結果は以下。
元画像

変換後画像
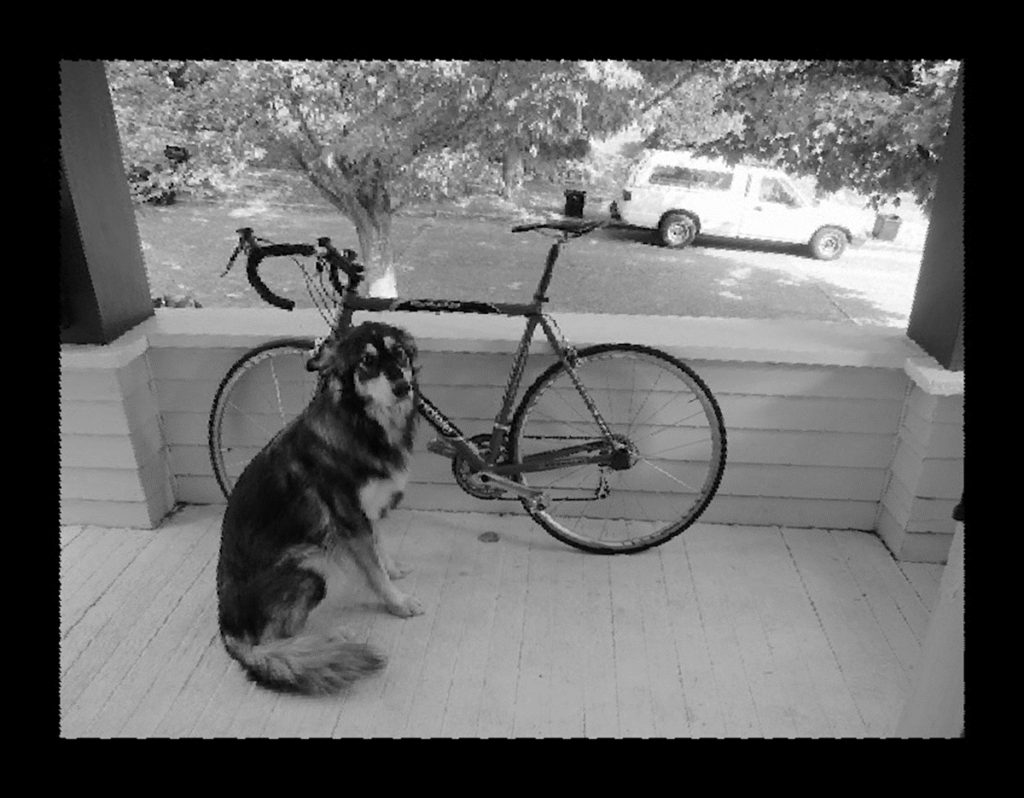
考察
Python(NumPy)もOKそう。
今回弄った変換パラメータに該当するコードは以下になる。
x0=-0.5; y0=-0.8;   # 左上
x1=-0.8; y1= 0.8;   # 左下
x2= 1; y2= 1;   # 右下
x3= 0.4; y3=-1;   # 右上

x0t=-1; y0t=-1;	# 左上変換先
x1t=-1; y1t= 1;	# 左下変換先
x2t= 1; y2t= 1;	# 右下変換先
x3t= 1; y3t=-1;	# 右上変換先
コードの流れや構造自体はMATLABと一緒だから、調整箇所も一緒になる。
まとめ
- Python(NumPy)で射影変換の台形から長方形の変換を実施。
- 想定通り変換。
- コードの流れと構成はMATLAB時のコードと一緒なため、パラメータ調整箇所も一緒。
MATLAB、Python、Scilab、Julia比較ページはこちら


コメント